You can share a scheduling page (formerly knows as meeting links) with your contacts so they easily can book time with you. If you connect your calendar your booked meetings will sync with your connected Eleiko Office 365 calendar and appointments will be up to date.
This link can be sent to your customers, added to your emails signature, added it to the Contact Us cards on the web page or to an event (for example FIBO or HFA) landing page.
If you want it in your Enterprise email signature and/or on the Contact Us page let Kajsa Robertsson know.
If you want it on an event (FIBO/HFA) landing page let marketing@eleiko.com know.
Note if you only want to Log/Create meetings in HubSpot as a Sales rep please follow the instructions in this article
STEP 1 Connect your personal calendar
Create a new Event Meeting Scheduler (Sales Pro Seats previously called Paid seat)
Update default Meeting Scheduler (Core Seats)
Connect your Office 365 calendar to HubSpot
You can connect your personal Eleiko Office 365 calendar to the meetings tool. Before connecting your calendar, keep in mind the following:
- When you connect a calendar to the meetings tool, the associated inbox will automatically connect in your email integration settings. However, once your calendar is integrated, you can disable the inbox connection without disabling the calendar connection.
- Please ensure that you're logged into the correct Office 365 account before connecting it with HubSpot.
To connect a calendar:
- In your HubSpot account, click the settings settings icon in the main navigation bar.
- In the left sidebar menu, navigate to General.
- Click the Calendar tab.
- Click Connect your Calendar.
- In the dialog box, click Microsoft Outlook, then click Connect your calendar.

- Review the information in the dialog box, then click Accept and connect to Office 365
- Select your Eleiko account.
- Done
Create a scheduling page for Contacts to book meetings
To create a scheduling page, follow the steps below:
- In your HubSpot account, navigate to Sales > Meeting Scheduler.

- To create a meeting link, in the upper right, click Create scheduling page.
- In the dialog box, click One-on-One.
- Click Next.
- Continue setting up your meetings link following the steps below.
How to set up a scheduling page for an event for example FIBO or HFA (or other Event)
Depending of if you have a Sales Pro (formerly called paid seat) or Core seat you can do this differently.
Sales Pro
If you have a Sales Pro set you can create a new separate scheduling page to use for the event and use the original scheduling page for other scenarios.
In the section Overview you can edit internal name, who is the organizer, title and fill in a description if needed.
Name the scheduling page accordingly so that it is clear what it is about. Also make sure to set the Meeting Type.

With the new Event link you can set the specific dates for the event. so that your customers only can book these dates. You set the dates under Scheduling > Additional settings.
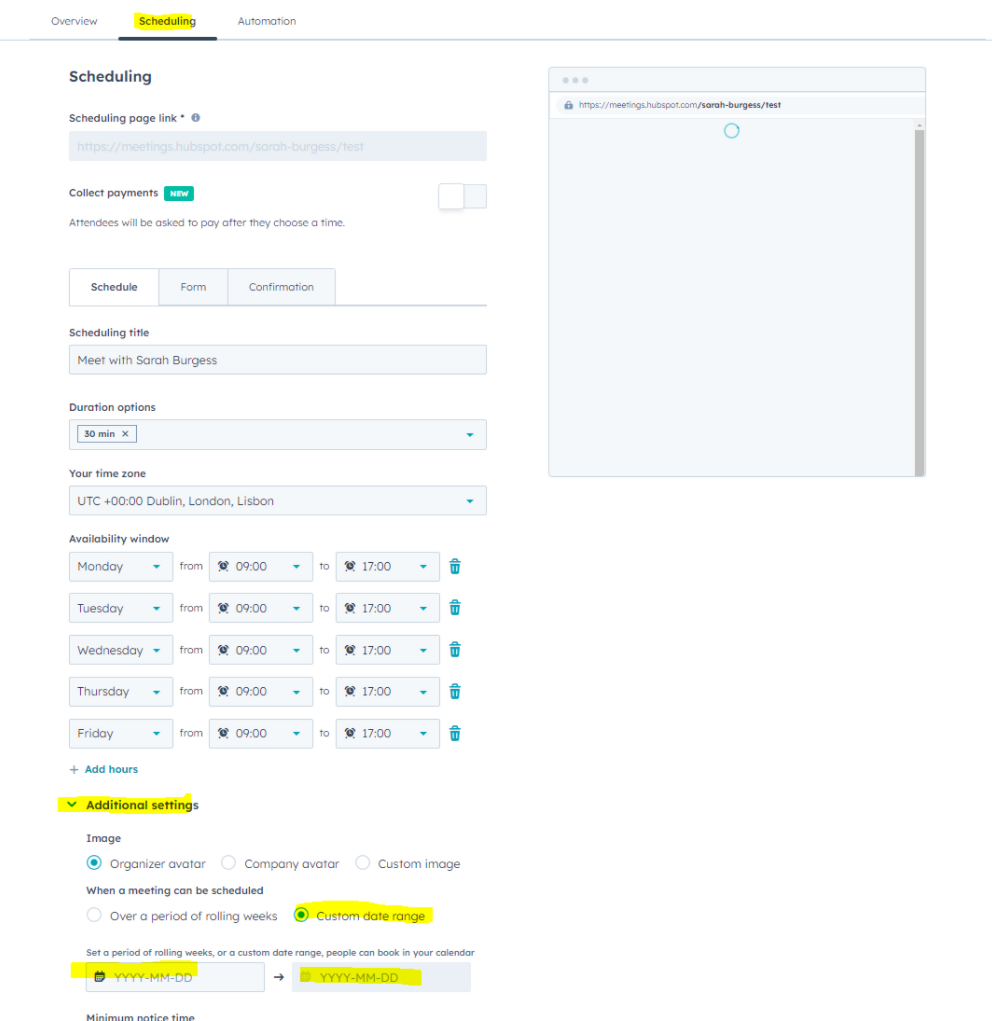
In the Addition settings you can also see settings such as Minimum notice time, Buffer time, start time increment. Minimum notice time might be good to put at 12 hours if you are at an event to make sure you can plan you day in the morning. If you put it at less than 12 hours make sure to check your emails if any new meetings gets booked during the day.
Unfortunately you can not set the specific date as a Custom date range for the event if you only have the Core seat. (if you have the lock by this option it means you only have Core). So you need to make sure the rolling time has enough weeks to pass the event date.

Update your default meeting scheduler page
Some of you only have the option of one meeting scheduler page (if you have a Core seat) which mean you need to update the default link and have all dates open.
Follow instructions below or view the recorded video of how to do this created by Louise for FIBO 2026.
Recorded instructions video FIBO 2026 Core Seat
To make changes in your default meetings link choose Edit when hovering over the meetings link.

From the section Overview you can edit internal name, who is the organizer, title and fill in a description if needed.
If the scheduling page is for an event name the scheduling page accordingly so that it is more clear and we will just assume that customers will only book those dates for FIBO/HFA. Also make sure to set the Meeting Type.
For example name it like below:
Make sure to still set the Availability window with correct days and hours.
As well as that you have added enough weeks forward so the customer can book during the event date. 
In the Addition settings you can also see settings such as Minimum notice time, Buffer time, start time increment. Minimum notice time might be good to put at 12 hours if you are at an event to make sure you can plan you day in the morning. If you put it at less than 12 hours make sure to check your emails if any new meetings gets booked during the day.

If you calendar is connected make sure these dates are not blocked in your calendar. For example if you added a meeting called FIBO for all of the dates it needs to have the status "free" or you need to delete it. Otherwise it will be blocked and these dates will not be able to be booked by a customer.
Scheduling
In the menu to the left you can choose Scheduling to change the settings about the times available. For example, if you can book 15 minutes, 30 minutes, or 1-hour long meeting. You can also choose your business hours, so it is not possible to book outside of these and you can set your time zone.
In advanced settings you can add a photo that will appear on the booking page. You can also set for how long you will show available times to book.


*Images above (advanced settings)
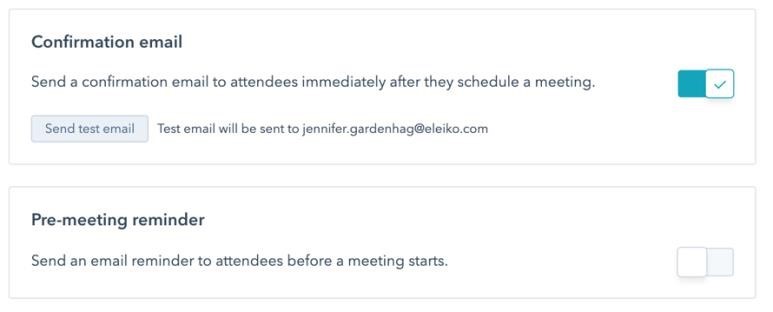
Automation
Here you can decide if you want there to be sent a confirmation email to the customer and also set reminders if needed.
Share meeting links
Once you've created a meetings link, you can share it with your contacts or embed it on your website.
- In your HubSpot account, navigate to Sales > Meetings.
- Hover over the meetings link and click Copy link.

Note: Some settings are only available for for those with a paid seat. If you notice you do not have the correct permissions please contact your manager or Kajsa Robertsson.
Receive bookings
If you connect your calendar to the meetings tool, visitors can book a meeting using the meeting link and the meeting will get added to the connected calendar. When a visitor clicks your meetings link, they can select a date, time, and length of time if you've set multiple duration options. They'll then be asked to enter their contact information and answer any custom questions you've added to the meetings link.
If a calendar is not connected, the booking page will be in offline mode, so meetings can be requested but will not be automatically added to the calendar.

When a meeting is booked, you'll get an email alert with the booking time and the contact's name. You can click to view the contact in the CRM or view the calendar event in your integrated default personal calendar. The prospect will also receive a calendar invitation with all of the meeting details.
If you want to learn more about Meeting Link in HubSpots own Knowledge base you can read this article: https://knowledge.hubspot.com/meetings-tool/create-and-edit-scheduling-pages